Mines
 |
Incomplete page ahead!
This page currently lacks crucial information! Please add onto it. |
| Warning! Spoilers ahead!
Proceed at your own risk! |
The Mines are a location within Fear & Hunger, found in the Level 5 and 6 within the Dungeons of Fear and Hunger. Cave-ins are frequent if one uses Explosive Vials foolhardily within the area, especially on walls that prompts the players to use or not to use the Explosive vial. It's an instant game over as the player is trapped underneath the rubble. Note that this section contains the Cavedweller Village and the Altar of Darkness.
Interacting With Nosramus (Level 5)
Nosramus' first hideout is in the library at the top left of the level 5 Mines. His second one is just past the Salmonsnake pool. To get there, the player must have the Scroll of Walking on Water. The scroll is given as the reward for solving the first of the three treasure maps in Isayah's questline.
Accessing the Collapsed Mines (Level 6)
It's possible to cause the Level 6 Mines to safely collapse and permanently switch to a different, collapsed version of this area. To do so, the player needs the special book The Passages of Ma'habre, as it will teleport them to a different map just in time to stay safe from being buried in the rubble. To trigger the collapse in a safe way, the player needs to find a sword (Blue Sin) stuck in a pile of rubble and pull it out, then immediately read The Passages of Ma'habre. After the book stops working, they will be teleported to the collapsed version of the Level 6 Mines instead of the intact version they left while reading the book. Note that exploring through the Collapsed Mines, the player will find an alternative pathway for the Deeper Thicket and a skeleton which contains Jingasa kabuto, Eastern silk robes, Charm of the Yggaegesu for the loot.
Alternately, you may ask a skeleton (or possibly ghoul) you have raised through the Necromancy skill to pull the sword, though you will **not** be able to retrieve the sword. Note: you will need to have space in your party to accommodate the raised character until this is done. In order to do this, you must attempt to pull the sword once, observing the shaking, at which point the option to have a party member do it will become available in the interaction. You should remove any gear the character is equipped with. You will then be notified that the character is waiting for you to move to a safe distance. You have the option to abort the plan if you interact with the character again, otherwise, once you have moved a sufficient distance away, the collapse will happen.
Trivia
- Game creator Miro Haverinen toyed with the idea of introducing a random tentacle monster encounter instead of the typical Salmonsnake spawn point in this map, for added variety. Despite finding the concept of randomized unique encounters intriguing, he opted not to pursue it for this optional battle, choosing to allocate his time to more impactful aspects of the game.
Gallery
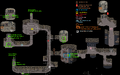
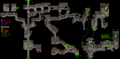
Annotated map of Level 5 Mines version A.
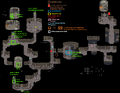
Annotated map of Level 5 Mines version B.
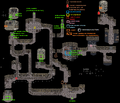
Annotated map of Level 5 Mines version C.
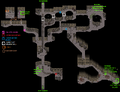
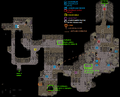
Annotated map of Level 6 Mines.
Annotated map of Level 6 Mines Cave-in.
Annotated map of Level 6 Mines - Cavedweller Village (exterior).

Annotated map of Level 6 Mines - Cavedweller Village (interior).
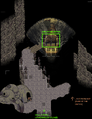
Annotated map of Level 6 Mines - Altar of Darkness.
.png)
.png)
.png)
.png)
.png)
_A_(Annotated).png)
.png)
.png)
Music
| Name | Location | Duration | Music track |
|---|---|---|---|
| God of the Depths | At the Mines and the Altar of Darkness | 02:20 |