Basement
 |
Incomplete page ahead!
This page currently lacks crucial information! Please add onto it. |
| Warning! Spoilers ahead!
Proceed at your own risk! |
The Basement is a location in Fear & Hunger, composed of Levels 2 and 3 within the Dungeons of Fear and Hunger. Sometimes there is an Elite guard roaming the area, but this is not always the case and depends on game randomization.
Level 2
Layout
Level 2 - Basement is among the game locations that offer map variations: A and B, with one selected randomly for each run of the game. While their layouts share similarities, there are slight differences in enemy numbers and accessible loot containers.
This basement area likely served multiple functions: storing wine barrels, housing an armory room, and containing a small pantry. However, it took a sinister turn as it became a repository for a large number of decomposing human bodies, also attracting many meat-eating flies. Notably, it features a giant ritual sigil dedicated to the God of the Depths alongside a frequently appearing unidentified sigil of a headless pentagram. Alas, there is also a reinforced steel door behind which the sentient sword Miasma is sealed.
Both map variations have a metal door barred from the inside, that can only be opened by jumping down the well in Level 1 - Courtyard. Map B has an additional metal door barred from the north and also a locked wooden door that leads to the pantry.
Gameplay
In Level 2 - Basement, the Mind depletion rate is set at 1 Mind per 1000 frames (or 16.6666... seconds). Unlike other areas, there are no lightable candles or torches available; the only way to temporarily halt the depletion is by utilizing a Torch from the player's inventory.
Enemy encounters
- Maneba - They slowly roam the map and will pursue the player if alerted, but can be easily avoided in most cases. Map A holds 3 Maneba, while Map B holds 4.
Loot
The predominant item in this region is Dried mushroom, which the player can gather up to x8 units directly from the ground around the map. x1 Green herb and x2 Blue herb are also sprouting on the ground.
In both map layouts, there is a room with armories providing useful starting armor. Players can collect up to x2 pieces in Map A and x4 pieces in Map B, but they need to correctly call a coin flip each time to get loot.
Lootable barrels and crates are plenty. Both map layouts have wine barrels that provide an opportunity for players to gather Wine vials, albeit at the cost of one Glass vial per use. Map A boasts 5 wine barrels, with 3 of them allowing two sips each, while Map B contains 4 wine barrels, with 3 of them also permitting two sips each.
Also in this area, following the room with a giant sacrificial circle, there is a door that only opens by using the Crow Emblem Key or by brute force during battle. It leads to a chamber that contains the unique weapon Miasma.
On Map A, players will find a chest behind the barred metal door, which holds the regular loot table for this type of container. On Map B, the chest will be located close to the door that leads to Miasma and will always hold x1 Small key, likely to help the player with opening the locked door to the pantry.
Recruitable characters
A skeleton can be found sitting right next to the door that leads to Level 3 - Basement. It can be recruited to the player's party through the use of the Necromancy spell.
Depending on the area's layout, two of the area's tiles will be cursed and teleport the player to the Flipside if walked over.
Level 3
The center area of this map is patrolled by Iron Shakespeare, who is relatively easy to avoid if the player does not wish to engage in battle.
There is a bed in the top-left room that is safe to save in once without it prompting a coin toss. There is a cooking fire right next to it, along with a partial statue of a woman with a crow resting on her left arm. If you lose the coin toss that happens after the first safe save, you will be disturbed in your sleep by the Crow Mauler and face him in an inescapable boss battle. If you win the battle against him, you can grab the Crow Emblem Key from his corpse.
In the top-middle section of this area is a locked door that can only be opened if you break it down using force. Small keys do not work, there is no unique key that fits the lock and no way to open it from the other side either. The hallway behind this door has a corpse at the end of it that has the weapon Bone shears stuck inside it. Picking up the Bone Shears causes Miner Spectres to spawn.
The room in the top-right corner of the map is where you can find Ser Seymor. As you progress through the game and meet other characters, it is possible to meet the right conditions to also have Buckman and Jeanne there. If all of them and Ser Seril have been rescued, none of them will be present and the player will find Buckman's letter and a Ring of wraiths instead as a sign of thanks. If only Jeanne is present after rescuing her and you talk to her, she will give the player an Elixir of body and an Elixir of mind. This is generally only the case if Buckman has been ratted out to Trortur or if the player talked to them previously, the latter of which leads to them heading off deeper into the dungeons on their own.
The bottom-left area of the map, which connects it to Level 2, holds a small burial ground where Leyron of the Corso, Jona, Ser Andérs, Ser Jaycob, Ser Sonya, and Yuho of the Northern woods were interred.
Trivia
- The player can talk to the flies swarming around the corpses in this level using Mastery over insects.
Gallery
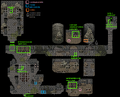
Annotated map of Level 2 Basement version A.
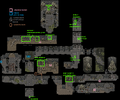
Annotated map of Level 2 Basement version B.
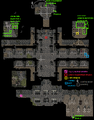
Annotated map of Level 3 Basement.
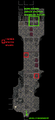
Annotated map of Level 3 Basement Corridor.
.png)
.png)
.png)
.png)
Music
| Name | Location | Duration | Music track |
|---|---|---|---|
| Basement of Flies | At the Basement | 01:51 |