Museum
| Warning! Spoilers ahead!
Proceed at your own risk! |
"The museum has an infectiously festive feel inside."
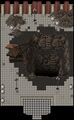
The Bohemia National Museum is a Location in Fear & Hunger 2: Termina. Being one of Prehevil's major landmarks, it hosts a public party surrounded by mysterious figures, where the law of physics seems to be circumvented. The Museum is situated at the temple site section of the inner city of Prehevil, west of Hollow Tower.
Lore
As it is the only museum in Prehevil, it serves as an art museum, a history museum, and a multitude of other museums all at once: a current exhibition on show dives deep into the various beliefs around the world, with many religious artifacts on display.
During the events of Fear & Hunger 2: Termina, the museum is hosting a grand masquerade celebrating the end of times, the Festival of Termina. Behind their elaborate masks, the attendees engage in what appears to be animated conversations. Their heads nod in unison, and their dry lips move in synchronization, yet no audible words escape their mouths. It is as if they have been trapped in an eternal state of autopilot, possibly a lingering effect from a real, past masquerade where people were inexplicably left idle. The masks also hide the Moonscorched skin from their faces, indicating that these partygoers have been punished by the Moon God Rher himself.
Location
The museum contains a looping maze layout, due to the inconsistency of laws of physics. The player can interact with some objects which are inside glass cases, a few of those can be broken but it will release an alarm, locking up other glass cases, meaning the player needs to choose which item they wish to pick up. However with enough haste, it is possible to get all items. Although the alarm can be activated, none of the entities in this location will become hostile towards the player.
On the section with stairways, the protagonist can interact with the clock as a form of the puzzle to set up the correct time and choose which god is, solving the puzzle will unlock the double doors from downstairs. To solve this puzzle, the player needs to collect hints from those entities, starting with Jeeves dialogues about meeting 3 figures, which are the "The Red Devil", "The Sun Priestess" and "The Happy Mask Salesman". The Red Devil will hint about the 35 minutes until 25 for the hour, the Sun Priestess will hint about the hours of the truth that lies between 1 and 2 and the Mask Salesman mentions that this season is the month of sulfur.
The answer for the clock is 13:35 (the hourly arrow must be set after 1) and the god symbol is a triangle between a triangle, which symbolizes the god of Sulfur.
Behind the door, the protagonist will find a room with a large manmade hole, climbing down the hole will reveal the final location of the bunker with a big mechanized gate on the view. This gate is locked and it can only be opened after turning on all the 3 telelectroscopes from another bunkers, unlocking the gate will lead into the White Bunker's dungeon.
NPCs
- Pocketcat
- Jeeves
- Daan (Only after being mutated, replacing the role location from the original Pocketcat on day 3 at morning)
Enemies
- Judgement (Only after Tanaka has mutated, found next to the Red Devil)
- Mechanical dance (Only after Olivia has mutated, found roaming through the corridors on Day 3 Morning)
- Poe
Loot
- Gaelian greatsword (Obtained by breaking the display case)
- Yggaegetsu amulet (Obtained by breaking the display case)
- Chac chac (Obtained by breaking the display case)
- Fluted breastplate
- Fluted armpieces
- 4 Glass shards (3 will appear by breaking the display cases)
Dialogues
| Party Talk (Outside Museum): |
|---|
|
| Party Talk (Inside Museum): |
|---|
|
| Party Talk (Museum Ballroom): |
|---|
|
Trivia
_overworld2.png)
- Even if the player is able to use Short circuit, it is not possible to deactivate the alarm system.
- If Olivia gets moonscorshed, the player will witness Pocketcat leaving the museum while pushing her vacant wheelchair, saying that she felt a bit left out from the party. This implies that Pocketcat may have been responsible from the transformation for Olivia.
- It is possible that the crowned creature found while roaming around the corridor could just be a regular horse under the sheets, second by the asset file's name and the unused character asset with a similar file name.
- Numerous artworks showcased in the Museum draw inspiration from real-life masterpieces. In addition to the clock plate puzzle, which pays homage to the renowned Prague astronomical clock, or Prague Orloj, situated on the Old Town Hall in Prague, the capital of the Czech Republic, there is a notable collection of war-themed paintings that directly reference authentic works of art:
- The Third of May of 1808, by Francisco Goya (1814);
- Guernica, by Pablo Ruiz Picasso (1937);
- The Charge of the Lancers, by Umberto Boccioni (1915);
- The Battle of Alexander at Issus, by Albrecht Altdorfer (1529);
- and Consequences of War, by Rubens (1638-1639).
- If playing as O'saa, Nas'hrah will respond to some of the interpretive labels of art and artifacts scattered throughout the museum. He will express anger at historical interpretation that differs from his thoughts and experiences, as well as share some of his thoughts on the nature of humanity and godhood.[1]
Gallery
- Map

Map Point.
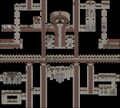
Full Map.
Full Map (Ballroom).


- Screenshots
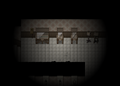
The few display cases that can be breakable.

- Battle Background
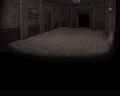
In battle.

| |||||


| |||||||||||||||||||||||||||||||||||